Followers / Seguidores

Showing posts with label neckwarmer. Show all posts

Monday, January 21, 2013

SCARF: Lotus Flower Lace Scarf Vintage Pattern


January 21, 2013:

Lotus Flower Lace Scarf Chart - Free Vintage Crochet Pattern

Hi everyone,

I can across a very pretty scarf pattern yesterday and I want to blog-share this with you.  It is a chart which I have seen a lot but what caught my eye about this website was that the pattern for the chart is also written out.

Here is the link:
http://thecrochetlounge.com/2013/01/lotus-flower-lace-scarf-free-crochet-vintage-pattern/


The chart is there as well as some pictures.  This is at Amanda Watson's blog and she notes that this pattern was from a vintage publication called, "The Creative Wife, Volume 6 published by Sea & Co. Publishings in 1915.   Wow!    :)

This not only has a chart diagram, it has written directions!    :)   :)

-Lee Ann Hamm
http://cgli.us (crochet names and rosary patterns)
http://crochetgottaloveit.blogspot.com

Sunday, January 8, 2012

My Crocodile Stitch Neckwarmer is Finished! Plus Necklace!

My Crocodile Stitch Neckwarmer is finished! I used 3 strands of size 10 thread held together and a size G Clover crochet hook.

I bought this wonderful patterns from Bonita Patterns on Ravelry.com.  It is an excellently written pattern and is easy to follow.


You see the crochet flower necklace around my neck?  I also managed to design this on my own.

There's another potential idea draped over my right shoulder!

Wednesday, January 4, 2012

UPDATE: Alligator Stitch / Crocodile Stitch Neck Warmer!

TA-DA!   I'm finished my first crocodile-stitched crochet item:

All I have to do is sew in the ends and add a button and it will be ready to wear.  It's pretty thick and I think it  will be nice and warm for winter.

Here is the finished item.  I wrote out the materials and final row count to equal the 26 inches required for this pattern:


My former "progress" pictures are here"
Alligator Stitch / Crocodile Stitch Neckwarmer:
http://crochetgottaloveit.blogspot.com/2012/01/alligator-stitch-crocodile-stitch-neck.html


Sunday, January 1, 2012

Alligator Stitch / Crocodile Stitch Neck Warmer!!


(anyone know how to rotate a photo in the blogger editor?  I haven't been able to figure it out without re-saving it on the hard disk and going that route).

I recently purchased a pattern for a Crocodile Stitch Neck Warmer from Bonita on ravelry.com
It is a superb pattern and very well written, plus it has some great photos to help you make this pattern.

She also has a facebook group page at: http://www.facebook.com/BonitaPatterns.  

The materials I'm using are 3 strands of size 10 thread held together and a size G Clover crochet hook.   I wound strands of thread into a ball before I started this neck warmer, so that I wouldn't have to constantly fiddle with having 3 separate balls of thread to contend with plus, it takes up less space when you can discard those cardboard cylinders inside the balls of thread.

I started on this Saturday, December 31, 2011 and I am continuing to work on this Sunday, January 1, 2012, while watching my New Orleans Saints play the Carolina Panthers.  What a game with records broken in the NFL during this game!!

  A Colston touchdown catch!

 Ivory has "wheels" and is quick!


    Dunk Dat Ball, Graham! Amazing athlete who only played 1 year of college football - he was a college basketball player for the most part.


Here are some "progress" photos.  These were taken Saturday, December 31, 2011:


Note:  if anyone knows how to rotate these around in the blogger.com editor, I would appreciate the info.

You can see that I have 10 rows completed.  The "scale" row is the even-numbered row.  If you flip your piece over, you can see the V-Stitch rows (odd-numbered rows), upon which the scales are crocheted.


Hope everyone had a wonder first day of the new year, 2012!     :)

Sunday, November 27, 2011

Pineapple Neckwarmer (update), Nov 27, 2011

Hi everyone,

Well, I worked up another Pineapple Neckwarmer using the Microspun yarn (2.5 oz skein) from Lion Brand. I used a size H hook with the Microspun.

This yarn is soooo soft, but it does split easily.  To get the length to 19 inches (as specified in the pattern before making the first keyhole row), I had to do 32 rows.  Just be sure to measure and try it on as in this the picture below, to get an idea of how the length is supposed to be.


One of my sons peeked in the picture.  That's Patrick!  :)  :)

And, I have started a 3rd neckwarmer using a size G hook and 2 strands of size 10 thread held together.  I'm using Southmaid thread.  I really like the "drapy" feel of cotton thread and I think that this one will come out nicely too.   :)

Here are pics:

Link to the Pineapple Neckwarmer pattern:


Thursday, November 24, 2011

Pineapple Neckwarmer (English), (translated from Rose's Portuguese pattern)

March 4, 2014:
**New photograph added of the foundation segments and of Row 1 and how the stitches are made.

**Also, I made the wording clearer on the 1st through 4th rows (this is the red text).  I was literally translating the language and I prefer to make the beginnings of the rows in the corrected text.
---------------
**November 25, 2011:
I started working up my first Pineapple Neckwarmer scarf yesterday on the road, and I decided upon using Bernats Baby Coordinates Yarn (I had a partial skein of this), and a size H hook (Clover brand).


  Upon working up my first pineapple neckwarmer, not only did I discover that I made some minor typos in the pattern, there is also an adjustment in the length of the main body which needs to be noted in the pattern.  Basically the length in my sample on rows 5 - 19, was not long enough.  Maybe if a larger yarn and larger hook were used, this wouldn't be the case.


    In order for the length to fit me, it needed to measure 19 inches (without the keyhole rows or the pineapples).  I've also added a photograph on how I did a measurement and how it's supposed to look before making the keyholes and pineapples.  My sample with the Coordinates baby yarn and the H hook had to be 29 rows instead of 19 rows.


   I am typing in the corrections, as noted in the red fonts.  Where you see the red fonts, is where a correction or an adjustment was made.


I received a reply from Rose at pinkrosecrochet.blogspot.com.  She gave me permission to repost this neckwarmer (which I translated to English), on my own blog.  

---------------------------

Hi Rose,
Great purse! Thank you.

Can I ask you one more quick question? I managed to translate into English (with the help of your video), the Abacaxi pattern (neckwarmer).

May I post the English version to my blog, please? I am awaiting your reply and thank you. :) :)
Novembro 22, 2011 11:27 PM
-----
Hi, Lee Ann!
Yes,of course you can! I'm glad to see English neck warmer pattern on your blog.)):)

Thanks
Rose
Novembro 23, 2011 9:56 AM

---------------------------

Here you go and enjoy!  :)


Pineapple Neckwarmer 

(Golhina Abacaxi da Rose)


**Materials:  Worsted weight yarn (I imagine you might want a soft yarn), 1 pin back, white glue or hot glue, large-eyed sewing needle
**Hook size ... I haven't determined yet.  I need to work up one of these first, but I'm guessing either an F, G or an  H hook.


Shell:  3 Dc, ch 2, 3 dc in indicated place or stitch.

Front Post Double Crochet (FPDC):  YO; starting from the front, place hook from front to back to front around the post of indicated stitch in row below.  Complete as a dc.
Back Post Double Crochet (BPDC):  YO; starting from the back, place hook from back to front to back around the post of indicated stitch in row below.  Complete as a dc.
YO:
 Yarn Over

Beg:  Beginning


To begin foundation (segments):

*Note, this will not be a traditional foundation chain.  Instead, think of it as 5 "groups of loops."  I added a photo for clarity.


Ch 3, 1 dc in 3rd ch from hook (segment made)

Ch 3, 1 dc in side (top of dc just made) 4 times (4 segments made).  You will have 5 segments total as your foundation row.

*These are what the segments will look like.  Try to make your dc stitches a little loose so that this will not curl up.


Turn work so that wrong side is now facing.  This photo shows the right side of the segments.


In 1st segment:

Work a ch-3 (this will be counted as a double crochet stitch).


Work 3 dc, ch 2, 3 dc in same place (you will work these stitches in this first little segment or loop).


In 2nd segment:
Work 1 dc in 2nd (middle) segment.

In 3rd segment:
3 Dc, ch 2, 3 dc.

In 4th segment:
Work 1 dc.

In 5th segment:
3 Dc, ch 2, 3 dc, 1 dc in 1st ch of beg ch-3 (the very 1st chain you made at the beginning), turn.


*top example in this photo are the wrong side of the segments turned to face you.

**bottom of this photo is the first row completed and what it will look like.

Row 2: 
Chain 3 (counts as beginning dc), Shell in next ch-2 sp (Shell in Shell just made), 1 FPDC around next dc between Shells (the ridge just made is facing you), Shell in next Shell, 1 FPDC around next dc between Shells, Shell in last Shell, 1 dc in top of turning ch-3 (at the beginning of Row 1); turn.

Row 3:
Chain 3 (counts as beginning dc), Shell in next Shell, 1 BPDC around next dc between Shells (ridge is facing away), Shell in next Shell, BPDC around next dc between Shells, Shell in last Shell, 1 dc in top of turning ch-3; turn.

Row 4:
Chain 3 (counts as beginning dc), Shell in next Shell, FPDC around next dc between Shells, Shell in next Shell, FPDC around next dc between Shells, Shell in last Shell, 1 dc in top of turning ch-3; turn.

Repeat Rows 3 and 4 for a total of 19 rows, to measure 19 inches.  At the end of last row, turn.


*My sample with the Bernat Coordinates Baby yarn and a size H hook, had to be 29 rows to be 19 inches.  Just add more than 19 rows until your piece measures 19 inches.


Also, try in on at this point.  It needs to fit about like this:


Yuck, I look terrible without makeup on!

Row 20 (keyhole row):
St st in 1st sc, sl st across next 3 dc, sl st in ch-2 sp, ch 3, 2 dc in same sp as ch-3, ch 2, 3 dc in same sp.
Work segment as follows:  ch 3, 1 dc in 1st ch of ch-3 just made.
Skipping center Shell, work Shell in last Shell; turn.

Row 21:
Sl st across 1st 3 dc, sl st into ch-2 sp, ch 3, 2 dc in same sp as ch-3, ch 2, 3 dc in same sp, 7 dc in segment, Shell in next Shell; turn.

Row 22 (Base of Pineapple Row):
Sl st across 1st 3 dc, sl st into ch-2 sp, (ch 3, 2 dc, ch 2, 3 dc) in same ch-2 sp, ch 1, (dc in next dc, ch 1) 7 times, ch 1, Shell in last Shell; turn.

Row 23:
Sl st across 1st 3 dc, sl st into ch-2 sp, (ch 3, 2 dc, ch 2, 3 dc) in same sp, ch 3, skip next ch-1 sp and next dc, sc in next ch-1 sp, (ch 3, sc in next ch-1 sp), 5 times, ch 3, Shell in last Shell; turn.

Row 24:
St st across 1st 3 dc, sl st into ch-2 sp, (ch 3, 2 dc, ch 2, 3 dc) in same sp, ch 3, skip next ch-3 sp, sc in next ch-3 sp (ch 3, sc in next ch-3 sp) 4 times, ch 3, Shell in last Shell; turn.

Rows 25 - 27:
Repeat Row 24 having 1 less ch-3 sp in Pineapple until only one ch-3 sp remains in pineapple; turn.

Row 28:
Sl st across 1st 3 dc, sl st into ch-2 sp, (ch 3, 2 dc, ch 2, 3 dc) in same sp, ch 3, sc in ch-1 sp of pineapple, ch 3, Shell in last Shell; turn.

Row 29:
Sl st across 1st 3 dc, sl st into ch-2 sp, (ch 3, 2 dc, ch 2, 3 dc) in same sp, sl st in last Shell.

Fasten off leaving a length for sewing with a large-eyed sewing needle.

Working on opposite side of foundation ch (5 segments at beginning of pattern), make the 2nd Pineapple starting with Row 20.

At the end of Row 29, fasten off and sew in end well with a large-eyed sewing needle.

Optional:
Make a 3D Irish crochet rose (or a comparable motif or other flower or your choice), in a contrasting color or same color.  Attach a pin to back of Rose (or other flower/motif), and fasten it to scarf just above the keyhole, so that it hides where the halves of scarf connect.  Use the photograph as a guide to placement.

-------------------


*Here is the link for the original pattern at Pink Rose's blog:  
http://pinkrosecrochet.blogspot.com/search/label/Golinha%20de%20Abacaxi%20-%20Video%20Elaine
---------------------------
**I posted this to my own blog at my own blog:  crochetgottaloveit.blogspot.com,  (with Rose's permission, pinkrosecrochet.blogspot.com)
    --Lee Ann Hamm, November 24, 2011 (Thanksgiving day)

Sunday, November 20, 2011

Pineapple Neckwarmer (English)

Yipee! I'm am a little on "cloud 9" today and yesterday evening.


I have been admiring a pattern for a g-o-r-g-e-o-u-s pineapple neckwarmer for about 2 months now.


The problem? It's in Portuguese and I do not read or speak Portuguese.


Well, I found a video on youtube and listening to the words spoken in Portuguese as this item was being made, I was able to write the pattern in English. I've NEVER done anything like this before!


I have plans to post the English version on this blog soon.   I have this re-written in a notebook and I'm fixing to snap photos of the pages, just to have another copy someplace else, if the notebook gets misplaced.  It's actually my recipe book.  


Here is the link for the original pattern at Pink Rose's blog:  
http://pinkrosecrochet.blogspot.com/search/label/Golinha%20de%20Abacaxi%20-%20Video%20Elaine


 Have a great day!

Friday, November 11, 2011

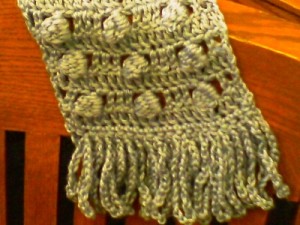
Bobbles Scarf

Bobbles Scarf

How appropriate for the cool weather which arrived here a couple of days ago. Brrrrr!  This looks like it would work up fairly quickly.

http://www.dailycrocheter.com/crochet/bobbles-scarf/


This crochet stitch is commonly referred to as the Offset Bobbles or Clusters stitch and is a simple and easy scarf pattern for crochet beginners to make. The bobble or Cluster stitch mean that there are more than one stitch that are cluster together in a stitch or in the front or back of a double crochet stitch or sometimes referred to as a double crochet post. The pattern is worked in multiples of 7 stitches. The chain 2 stitch is counted as one double crochet stitch or dc stitch and also the turning chain. If you want a wider or longer scarf all you need to do is the extra math. For example, if you want a scarf that repeats the pattern 4 times, you must multiply. Thus, you’d have 4 repeat x 7 stitches will give you 28 stitches the total number of stitches to begin your scarf project


A bobbles stitch is worked sideways and consist of working a five dc cluster around the post of the next dc. For example, you will work a double crochet by bring the yarn over (yo) your hook and inserting the hook behind the post of the double crochet stitch and drawing up a loop then working a double crochet, without completing the last step of a double crochet stitch. Repeat the step 4 more times. After your first and second double crochet you will have 3 loops on your hook, after third dc you will have 4 loops, after 4 dc you will have 5 loops and after the fifth dc you will have 6 loops completed. Then yarn over and draw through all the loops on your hook.
Scarf Pattern
Foundation row: make a slip knot at the end of your yarn; place the knot on the shaft of your size E/4 (3.50mm) crochet hook and chain 21.
• Turn your garment and chain 2, dc across to end of row. Row one completed with 21 dc.
• Chain 2, skip the first dc, dc in the next stitch, skip next dc, chain 1, dc in the next stitch; work five dc stitches around post of dc stitch just made, skip 1 dc, chain one and work 3 dc, repeat across row ending with skip 1 dc, chain one stitch, work one dc in next stitch, work one dc in the turning chain. Row two completed.
• Turn your garment and chain 2. Skip the first double crochet stitch, work dc across ending with a dc in the turning chain. Row three completed.
• Repeat rows one and two until you reach your desired length for you scarf.
• Work 1 row of dc across row. Fasten off. Row four completed.
Scarf Fringe
• Join with a slip stitch (ss or sl) in the first chain of your foundation row with right side (rs) facing. Chain 1 and work a single crochet in same chain as joining and in each chain across row to the end of row. Turn. Row one completed.
• Work a slip stitch in the first sc. Then chain 24 stitches, work a slip stitch in the next sc, chain 24 stitches repeat across to end of row ending with a slip stitch in the last sc stitch. Fasten off and weave in all loose yarn Row two completed.
• Repeat rows one and two on the other side of your scarf to complete your bobbles or clusters scarf. Fasten off.


Saturday, November 5, 2011

Knitted Neck Warmer

Hi everyone,

I saw this and even though I don't know how to knit, I thought this was very pretty!  :)  Enjoy!  :)