Followers / Seguidores

Showing posts with label garment. Show all posts

Saturday, January 26, 2013

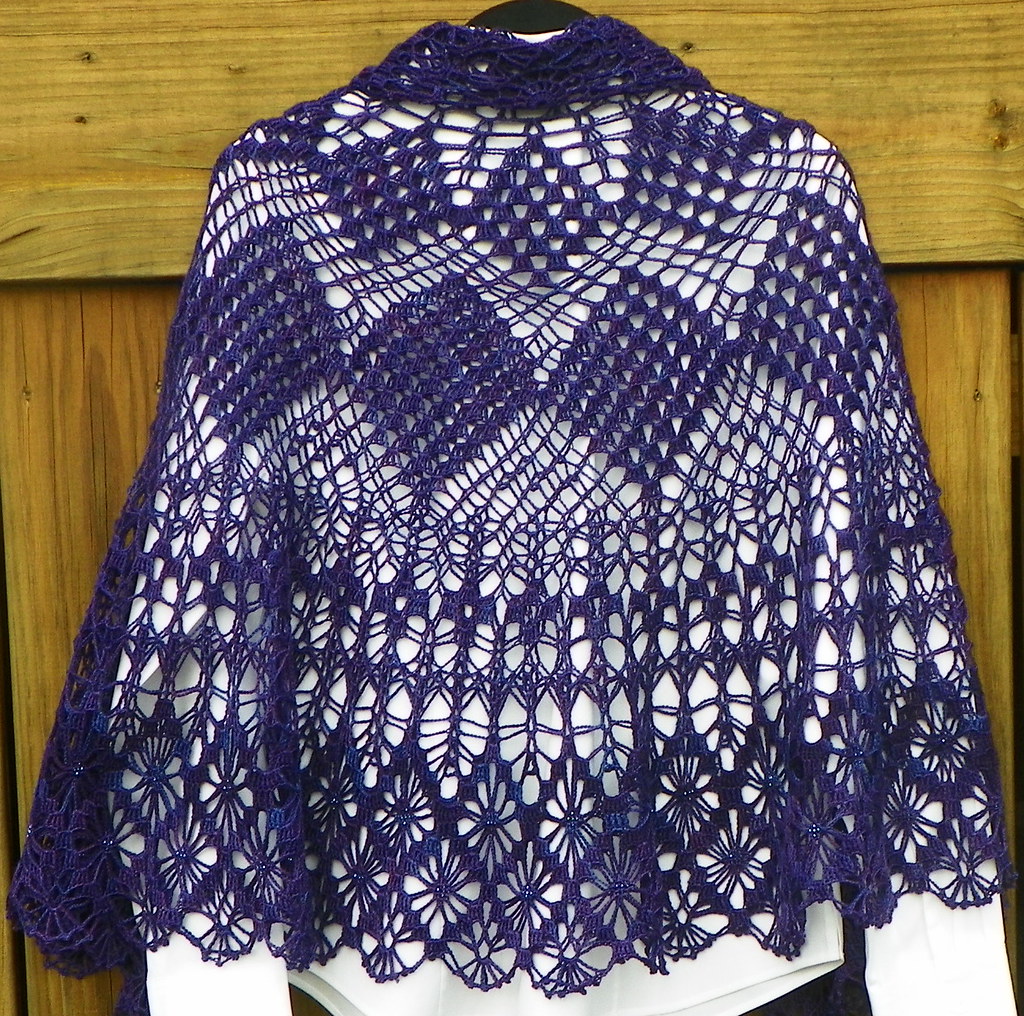
January 26, 2013: Beautiful Shawl made by Monica from an Elizabeth Hiddleson Tablecloth Pattern!

http://www.ravelry.com/projects/MonicaFoster/drum-tablecloth

I just saw this amazing shawl for the first time today and I am stunned!  I love this!!


The above link will take you to the details on how Monica created this crochet garment on her Ravelry.com page.

It is made from a vintage or antique Elizabeth Hiddleson tablecloth pattern and adapted by Monica to make this beautiful shawl.

Monday, February 20, 2012

Hexagon Motif Model2 Tunic (shirt, top) Garment

February 20, 2012:
As of this morning (and last night), I am re-starting a shirt with different materials.  Suffice it to say that on my first attempt at making this garment, I thought I had enough thread of the color I chose but surprise!  I have run out of this particular color.


I don't know what I will do with th e half-finished shirt, but I will probably rip it out and use the thread for something else ..... one day, but not anytime soon.  I still may be able to salvage this by incorporating another color and moving some motifs around.


Anyway, I had found this pattern on the internet and thought how pretty it was.  I had to learn and comprehend connecting a 6-sided motif together (for me, squares are still the easiest to work with).

Here is the pattern and graph picture I have to work with.  There is no indication of materials or hook size so, I am "winging it" and using a size E Clover hook and my 4/2 cotton which I bought from someone on Ebay.  (This 4/2 cotton is the same size as Perle Cotton size 8 or 10).


I have gauge pictures below in English and Metric and one overall picture of how it looks today:


 ==================================
February 26, 2012:

Here is a picture of how the garment is coming along as of Sunday, February 26, 2012.  I have the back completed and have started on the front of the blouse.


 ========================

February 27. 2012:

Monday evening, this is how the blouse looks now.  I have only 3 more motifs to make and attach at the bottom front of the garment.  


I am thinking of putting one or more rows of single crochet edging around the armholes, bottom and neckline of this.  I don't want to use anything fancier such as picots, in keeping with the outline of the motifs themselves.

Anyone know an edging which might work well with this blouse?  Please comment with your thoughts and thank you!   :)  :)

=========================

February 29, 2012  Happy Leap Year!

It is almost finished!!!!! 
 
I worked 2 rounds of single crochet around each armhole and two rounds of sc edging around bottom of  shirt.

Next step is to edge the neckline in a similar fashion.


More to follow later ......

Wednesday, February 8, 2012

DROPS Design Bolero #126-8 (2 strands size 10 thread held tog, size C Clover hook), size made XL

Hi everyone,

Well, I started this bolero back on January 13, 2012 and I have picked it back up again to finish it.

It's the bolero pattern from Garn Studio www.garnstudio.com #126-8.


I am a self-admitted thread addict so instead of yarn, I am using 2 strands of size 10 thread held together and a size C Clover crochet hook.  I am making the XL size.  


I am "whipstitching" the squares together and then "whipstitching" them to the main part of the garment. This is the wrong side of the garment.


And as you can see, I have 2 more squares to attach.  I'll have to "ease" them in somewhat.


I have another crochet name to make for someone and I'll have to finish that first before concentrating more on my bolero.

----------------------
Saturday, February 11, 2012:
A couple of more "progress photos" to post here.  I have the last 2 squares (pictured above), in place and attached to the bolero and I've started the picot perimeter border around the jacket edge.  I will also be putting this on the armhole edgings.


So, what do you think?

Happy crocheting everyone!

Thursday, February 2, 2012

Triangle Motif Bolero Jacket or Shrug (size F Clover hook & Aunt Lydia's Double strand thread)


My Triangle Motif Bolero Jacket or Shrug (size F Clover hook & Aunt Lydia's Double strand thread)


January 29 & 30, 2012: Still crocheting and assembling my motifs one-at-a-time. Here are some pictures of the partially made item:


I used the Aunt Lydia's Double Strand Thread, which is essentially 2 strands of size 10 thread wound together at their factory. You could just wind 2 strands of your own size 10 thread and achieve the same thing, plus you have more of a color variety. I also used a size F Clover hook for this project:


Here are some gauge shots I took. I'm not sure, but I think that I have this worked up to gauge. My item is a little bigger than I anticipated but since it is cotton thread, a little shrinkage wouldn't hurt:


------------------------------------------------------

January 31, 2012:

All of the motifs are made and assembled and the shrug has been attached to form the armholes (hopefully, I did this correctly!).


One armhole:


The other armhole:


I have spent a lot of time trying to visualize this before I started the project and I *think* I know how to connect the armholes. The assembly graph isn't too clear and is confusing. I really hesitated before starting this project after looking at the pattern for about 2 weeks, trying to figure it out mentally before picking up a hook and thread to make it.

My youngest son is holding this up for me to take pictures and he's joking around and throwing up some goofy gang signs in the process. LOL:


-----------------------------------------
February 1, 2012: 
I have started the edging and I plan to have this bolero finished by tonight.
Patrick is holding the item up so that I can photograph it properly (he inserted some gang signs, LOL)

I don't think the ruffled edges around the neckline, down the front and the back will be a problem, nor do I think the edging around the armhole will be a problem. It's the connecting of the sides to form the armholes that is puzzling me. Oh well, gotta take the plunge sometime! :)

Pics to come later with the ruffled edging .....
---------------------------------------

February 4, 2012:
Despite having strep throat, running a fever and having a bad cold, I have finally finished this project.  Boy, was I knocked out with this cold starting Wednesday morning .... felt like I had been run over by a Mack truck!  Today, it only feels like I was run over by a pickup truck .... overall, I'm feeling much better. Took the last 3 days off from work to recuperate.

I think that the overall size of this garment is a little too big for me, but I don't know.  It looks a little big on the model in the pattern photograph too, so maybe I didn't mess it up too much.


 The green tank top doesn't go to well with this blue, but it makes a nice contrast for photography purposes.


Here are a couple of pictures of the back of the bolero:


I had the hardest time determining before I started this piece and after I finished, which was the top and which was the bottom of the bolero.  I'm still not entirely sure.  I've never made a garment with triangle motifs before and I think this is what is throwing me off.

For these pictures, I think I have it on correctly.

Here are 2 pictures showing underneath the garment.


And here is my helper I recruited to photograph these pictures, my oldest son.


I really enjoyed making the armhole edgings and the main edging on this piece because it was pretty straightforward.  Plus, I knew I was getting to the end of the project.

Happy crocheting everyone!


Monday, January 30, 2012

My 1st Shrug-Sonata Shrug (3 strands size 10 thread held together, size G hook) -1.jpg

I finished my first shrug!! I am pleased with the way it turned out, although I did have to improvise since I misread the dimension directions (ding-dong me!).
But in the end, I think it turned out very well for a 1st-time shrug.
I held 3 strands of Cameo size 10 crochet thread together and used a size G Clover crochet hook. I used a total of 6 balls and I'm pretty sure that these were 350-yard balls each. I'll have to check my stash.

I do like the weight and "drape" that the cotton threads give this garment, along with the larger hook.
More to come later on this......
-----------------
The next morning:
Yes, these discontinued balls of Cameo thread are indeed 350 yards each.  Instead of having 3 balls of thread bouncing around when you crochet, the easiest way to do this is holding the starting ends of 3 separate strands from each ball and then wind this into one big ball.  You are making your own "3 ply" cotton fiber at this point, plus having just 1 large ball is easier to handle and is more portable.

The pattern is by Melissa http://crochetvolution.com.  She has her sample worked up in a beautiful ombre small weight yarn.  On the size dimensions, I messed up.  I did achieve the 21 inches, but misread the 28 inches across the foundation chain (see pattern).  Soooo, I made a change.  I kept the 21 inches for the width and just made the pattern repeats for 28 inches.  The result?  My triple crochet shells go from side-to-side instead of up and down from bottom to top.  Oh well, either way looks good.    :)

*As of now, I wear a size 16 or an X-Large, to give you an idea of what size this shrug would fit.

My pet peeve about gauges ... I don't like a gauge which says to work up stitches such as "shells" or "in pattern."  Why not just do some basic straight stitches for a gauge?  It's much easier.  So, after I finished the shrug, I made up this gauge swatch and measured it in both English and Metric.

Here is a metric gauge:
5 Dc stitches = 3 cm:

And 5 rows of dc stitches = 7 1/2 cm


And for an English gauge:
4 Dc - 1 inch


And 5 dc rows = 3 inches:
 
Here is how I made my gauge swatch:

Here are some closeups of the Tr Shell stitches along with the hook I used:


Here are pictures of the sleeve seams.  I  have my hand behind the seam and we are looking at the wrong side of the seam in these pictures:


 And here is the back:


 To form the seams, I did a loose slip stitch across the beginning half tr-shell and across the next tr-shell:


 And here is the finished shrug on a coat hangar!


Check out Melissa's pattern for the Sonata Shrug at Melissa Mall at http://crochetvolution.com!